
Rails 5 is on the horizon. There are many great new features in this new version, but the one I'm most excited about is built-in WebSockets support.
Intro to WebSockets
In case you're not familiar with WebSockets, let me give you a crash course. In a traditional web application, the browser sends a request for a web page and the server responds with the page.
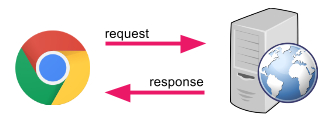
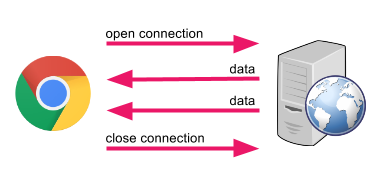
When the page is returned, the connection is closed. This is great if the page never changes, but it poses some problems when there are new updates on the server. The only way for the browser to get those changes, is to send another request and get another response.WebSockets solves this problem. In a WebSockets application, instead of making a request, the browser makes a connection to the server. This connection is persistent, and it's two-way. At any point during the connection, the server can send data to the browser, or the browser can send data to the server.
Action Cable
WebSockets has been around for years, and many applications are already using it. In fact, you can even use it in Rails 4, via several different gems. What Rails 5 provides is built-in support, via Action Cable.There's some initial setup to be done and you can find those details here. I won't get into the setup here, because it's subject to change, and it's not what I want to talk about.What I do want to talk about, is how Action Cable can be used to add real-time capabilities to Rails apps.In general, there are two components involved. A back-end channel, which is just a Ruby class that inherits from ApplicationCable::Channel] and a front-end subscription, which is just a Javascript object with some specific functions defined.
Creating a dog barking app
For this example, I want to make an app that will allow dogs to broadcast their bark to anyone listening.The first thing we'll need to do is set up a channel. To do this, we create a Ruby class, and inherit from ApplicationCable::Channel. We'll name this channel BarkChannel:class BarkChannel < ApplicationCable::Channel
def subscribed
stream_from "barks"
end
end
The other thing we're doing is setting up our subscribed method. This will get called when a new connection is made. Inside of it, we're calling stream_from "barks". That tells the back-end that this connection should receive all messages on the "barks" channel.Next, we need to set up the front-end to make a connection with the server. This is done via the following CoffeeScript:App.dogs = App.cable.subscriptions.create "BarkChannel",
connected: ->
disconnected: ->
The important part of this code is App.cable.subscriptions.create "BarkChannel". That makes a connection to the server, via the Action Cable channel "DogChannel". The connected and disconnected functions can be used to do things when we begin and end communication with the server.Next, we would need some UI that allows the dog to input a bark. I'll skip that part, for simplicity. Once the UI has been triggered, we'll call a bark function on our App.dogs object:App.dogs = App.cable.subscriptions.create "BarkChannel",
connected: ->
disconnected: ->
bark: ->
var myDogsId = 1;
@perform("bark", {id: myDogsId})
The bark function is first setting up an id for our dog. In a "real" app, this would probably be passed from the back-end when the connection is first made, but for simplicity, I'm simply hard-coding it here.Then, we're calling @perform, which is a "magic" Action Cable command that tells it to send the data ({id: myDogsId}) to the back-end side of the channel, using the bark method. So, let's set that method up:class BarkChannel < ApplicationCable::Channel
def subscribed
stream_from "barks"
end
def bark(data)
my_dog = Dog.find_by(id: data[:id])
my_dog.bark
end
end
Here, we're finding the Dog with the given id. Then, we're calling bark on it, which will handle our bark logic. At this point, we've made a full connection from the front-end to the back-end, which can be used to do any number of things.For our app, we're going to want to broadcast that bark event out to all of the other dogs that are listening. Let's use that bark method we've called to do that:class Dog
def bark
ActionCable.server.broadcast "barks", {id: id}
end
end
ActionCable.server.broadcast is the method used to send a message to all clients listening on the "barks" channel. We're also sending a hash including the id of the dog who barked.The last thing we need to do is write the code on the front-end that will handle the broadcasted message. We do that, using the received function:App.dogs = App.cable.subscriptions.create "BarkChannel",
connected: ->
disconnected: ->
received: (data) ->
# Handle the bark
bark: ->
var myDogsId = 1
@perform("bark", {id: myDogsId})
And that's it! We've made a complete request cycle, from the front-end to the back-end, and back again. However, to be clear, the communication does not need to be initiated by the client. That fact is what makes WebSockets so powerful; the server can send messages to the client, at any time. So, a social media site could instantly notify users of a new notification. Or, a web-based email client could notify users of new emails without needing a refresh or continuous polling. How about you try your hand at creating a simple app like the sample above and see the beauty of WebSockets for yourself!Need extra muscle on your next Rails project? GET IN TOUCH.
